Quote Templates:
- A quote template is a customizable solution to generate professional and standardized customer quotes.
- These templates allow businesses to present the products, pricing, terms, and other relevant information in a consistent and visually appealing manner to the customers.
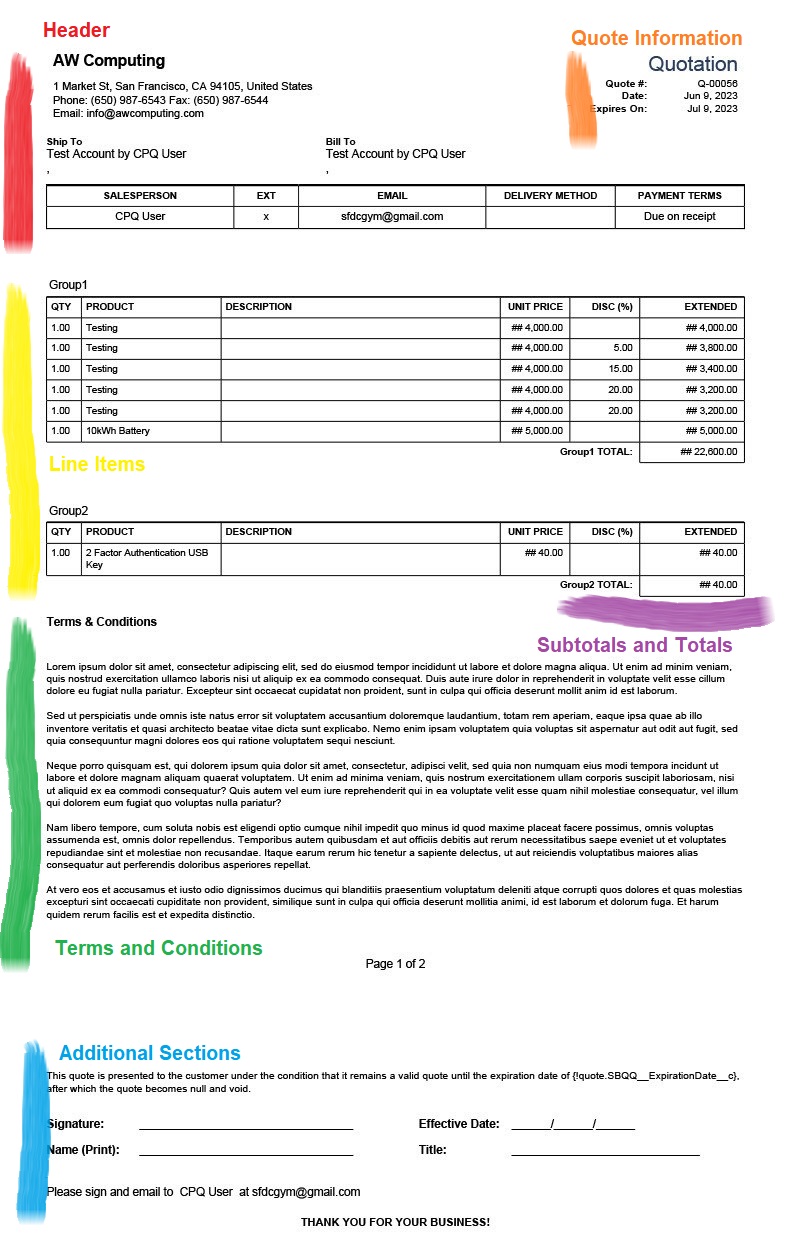
Key components of a quote template in Salesforce CPQ include:
- Header: The top section of the quote template typically contains the company logo, address, contact information, and any other essential details about the company.
- Quote Information: This section provides details specific to the quote, such as the quote number, date, expiration date, and the customer's information.
- Line Items: The core of the quote template, this section lists the products and services the customer is interested in purchasing. Each line item includes the product name, quantity, unit price, total price, and any applicable discounts or customizations.
- Subtotals and Totals: The quote template typically includes subtotal calculations for all the line items, followed by any applicable taxes, shipping charges, and other fees. The grand total is presented at the bottom.
- Terms and Conditions: This part outlines the contractual terms and conditions that apply to the sale. It may include payment terms, warranties, return policies, or any other relevant legal information.
- Additional Sections: Depending on the business needs, quote templates can have additional sections, such as custom fields for unique product configurations, optional add-ons, or upsell opportunities.
Steps to generate a quote document:
- Go to any quote tab and open any existing quote or create a new quote
- Click on Generate Document button. You will see the option to select the template, Paper size, and rename your document.
- To preview the document, click on the Preview button and to send the document to customers click on Save and Email button.
- Once you click on Save and Email button, CPQ first save that document to your quote and shows the following screen to send the email-
Important Fields in Quote Template:
Before we check the steps for creating a quote template, let's understand some important fields. For reference please check the below attached New Quote Template Creation screenshot-
- Template Name: Name your quote template.
- Default: If checked then this template will be considered as default for reps. When they are creating new quote documents, it will be by default selected.
- Deployment Status: While the administrator is working on building the template, this status can be set to In Development, and once the template is built, this status can be set to Deployed.
- Logo Document Id: If you want to add a company logo, then you can add the record ID corresponding to the logo stored in Salesforce documents in this field.
- Watermark ID: Here, you can provide the record ID of the watermark image that you want to use in your PDF. The watermark can be conditionally displayed for specific quotes. You have a Watermark Shown checkbox on the quote that needs to be selected for the watermark to get printed on the quote template. You can upload the watermark image in Salesforce Files to get the record ID. This checkbox can also be updated using a salesforce flow or apex that is based on business requirements, rather than reps updating it manually for every quote. For example, whenever the quote status is approved
- Page Information: This section contains many formatting options, such as height, width, margins, and much more, this field can be automatically updated using apex code logic in the backend.
- Other fields are used to control Header/Footer and Company information
Steps to Create Quote Template:
- Go to App Manager and search for Quote Template. Click on the New button and fill in the values as given in the screenshot-
Template Name: Standard Template
Deployment Status: In Development
Logo Document Id: Upload an image in the salesforce document. Please make sure you check Internal Use Only is selected.
Page Information: Set the page height, width, and Margin
Header/Footer Information: Set the header and footer content based on Business requirements.
Corporate Information: Set the company information ( or any account/contract information based on Business Setup)
Style Information: In this section put the values related to font and text color.
Fill the values and save the record.
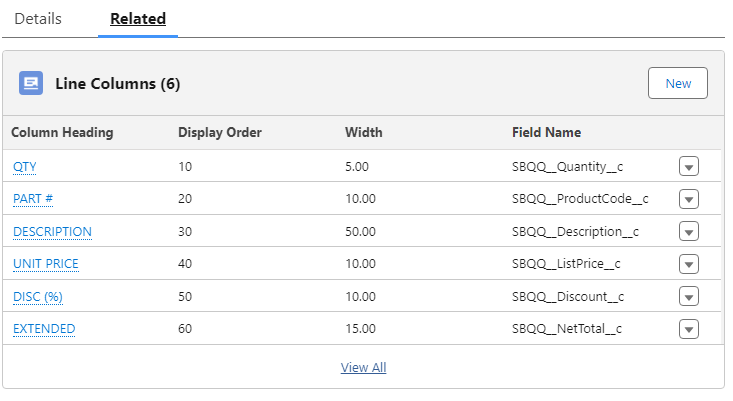
- How to add Line Item Fields in Quote Template?
Now go to the related tab and under the Line Column we can add quote line fields that we want to show in the line item section under quote document. Check the above quote line screenshot ( Line Item section- Highlighted in yellow). There we have added QTY, Product Description, Unit Price, DISC(%), Extended as shown in the below screenshot - - How to add additional documents to the quote template?
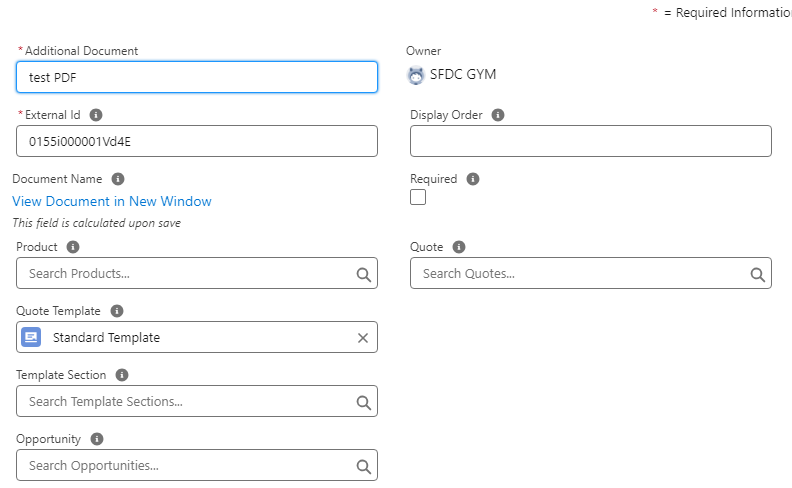
Now if you want to send any document along with Quote Document, then you can create an Additional Document record. Upload that document(must be in pdf format) to salesforce documents. Now open back the quote template record and go to the related tab. Click on the New button under the Additional Document section and create the record. Under the External Id field add that document record id which we have created before. - You can drag that document before or after Quote Document. Now click on the Preview button. You will see the updated Quote.
Template Content:
- A template document is made of one or many reusable template contents. Let's say you have multiple accounts(customer's customer or partner) for your customer and one wants to see some additional quote-level information in the quote document. To do that we will create a template content (which will use template section(s)). And if in the future another customer's account is required to use similar quote fields on template documents then you can use the same template content without rebuilding any custom logic.
- Template content is created to store specific data in the quote sections.
- Template sections are used to position and style the template content in the quote document.
Type of Content:
Salesforce CPQ has 6 template content types -
- HTML: In case of any custom requirements(cover letter, cover page, customer information, company information, signature block, and much more), Salesforce CPQ Template provides the option to write HTML and use that as template content. This template content can be used for multiple quote templates.
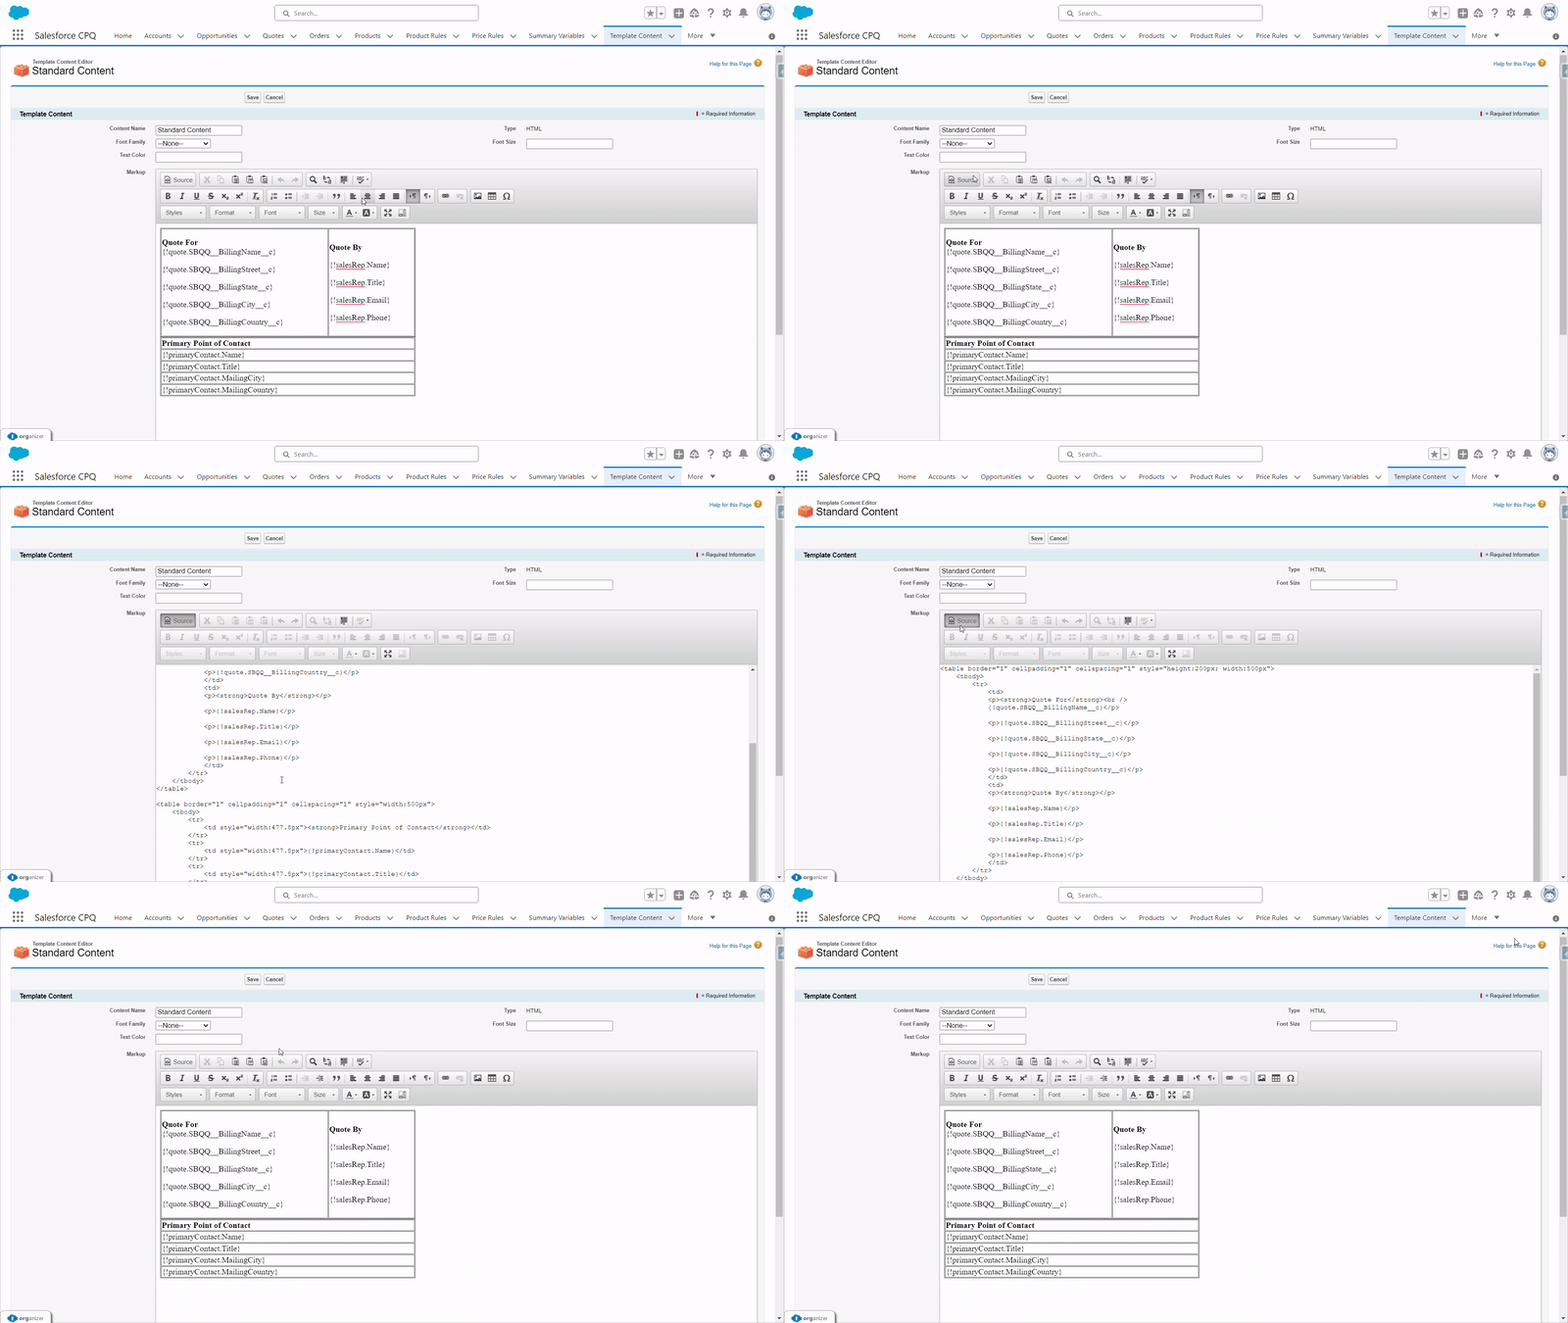
Let's understand the steps to create HTML template content. - Go to the Template Content tab and click on the New button
- Select HTML and click on the Continue button on Content Name put - Standard Content and under the Markup section click on the Source button and put this HTML given in the Git link. After that click on the Source button again. As given in the screenshot-
- Here if you notice we have used some special characters ( for example: {!salesRep.Name}). This is called Merge fields. Merge fields are used to extract the values and display them in the template. We will discuss Merge Fields in this article later.
- Save the template content record.
- Now go to the Quote Templates tab. Open template Standard Template, the one that we have created above or create a new template
- Click on the related tab and click on the New button under the Sections. Put the following information -
Name: Quote and Owner Information
Content: Add the Standard Content we created in the above step.
Display Order: 5, Save the record. - Now go to the Quote tab and open any quote. Then Click on the Preview button.
- Line Items: These display details about the quote line fields such as products, quantities, discounts, and so on. Line items can be displayed in a tabular format. We can also group them by a field or display them in separate blocks and display columns dynamically. The quote template should be a representation of the products purchased without changing the product catalog to meet the needs of the template.
Let's check the steps to create Create Line Items - - Go to the Template Content tab and click on the New button
- Fill following values -
Type of Content: Line Item
Name: Standard Line Item
Table Style: Price Dimensions as Rows with Summary
Save the record. - Now go to the Quote Templates tab. Open template Standard Template, the one that we have created above, or create a new template
- Click on the related tab and click on the New button under the Sections. Put the following information -
Name: Standard Line Item
Content: Add the Standard Line Item we created in the above step.
Display Order: 20, Save the record. - Quote Terms: These contain the terms and conditions for the quote. This can also be dynamic and based on the quote type. The quote terms can also be stored and presented using product records.
Let's check the steps to create Quote Terms- - Go to the Template Content tab and click on the New button
- Fill following values -
Type of Content: Quote Term
Name: Standard Quote Term
Font Size: 8
Save the record. - Now go to the Quote Templates tab. Open template Standard Template, the one that we have created above, or create a new template
- Click on the related tab and click on the New button under the Sections. Put the following information -
Name: Standard Quote Terms
Content: Add the Standard Quote Term we created in the above step.
Display Order: 50, Save the record. - Custom: Custom content allows us to display a Visualforce page within the section of our quote template.
- Template Top: The template top and bottom can be used in a similar way to a header and footer in any document. The template top can contain the company logo, the billing and shipping addresses, and so on.
Let's check the steps to create Template top- - Go to the Template Content tab and click on the New button
- Fill following values -
Type of Content: Template Top
Name: Standard Top
Font Size: 8
Mockup: It will show the default mockup. If you want to change it switch on the source button and modify the HTML based on business requirements.
Save the record - Now go to the Quote Templates tab. Open template Standard Template, the one that we have created above, or create a new template
- Click on the related tab and click on the New button under the Sections. Put the following information -
Name: Standard Top
Content: Add the Standard Top we created in the above step.
Display Order: 5, Save the record. - Template Bottom: The template bottom can include notes, signatures, dates, and much more.
Let's check the steps to create Template Bottom- - Go to the Template Content tab and click on the New button
- Fill following values -
Type of Content: Template Bottom
Name: Standard Bottom
Font Size: 8
Save the record - Now go to the Quote Templates tab. Open template Standard Template, the one that we have created above, or create a new template
- Click on the related tab and click on the New button under the Sections. Put the following information -
Name: Standard Bottom
Content: Add the Standard Bottom we created in the above step.
Display Order: 30, Save the record
We have configured all the steps. Now to validate the steps please open any quote and select the Standard Template and click on Preview Button-


